Thank you.
Now, fellas, I have a mission: I must take apart a MT Vector (coil spring job, pretty much like the UMC and that type) and need to know everything you can tell me about:
Things to watch out for on disassembly
Any difficulties common to the breed when re-assembling & useful techniques/good tools to have on hand.
I don't care about the warranty and will not send it back to the dealer because it took an insane 3 weeks to just get it here and I've had it with that particular scene.
I have to polish the plunge-lock and blade lock notch/cutout where the plunge lock holds the blade shut. The action is impossibly bad. I mean, it's like opening uncle Fester's coffin, only more grim.
Thanks in advance-
SK
MT maniacs please gather 'round here
Moderators: Bill DeShivs, The Motley Crew
Forum rules
There are a few things you should know before posting in these forums. If you are a new user, please click here and read carefully. Thanks a lot!
There are a few things you should know before posting in these forums. If you are a new user, please click here and read carefully. Thanks a lot!
-
Stone Knife
- Posts: 911
- Joined: Sun Jul 13, 2003 8:30 am
- Location: Gone.
- Contact:
-
Vagrant

- Self Appointed Authority
- Posts: 25715
- Joined: Fri May 24, 2002 10:07 am
- Location: Live Free or Die
- Contact:
[I think we just had a thread about this, but it's worth repeating].
Step one, heat a soldering iron. When hot, hold it to a screw-head for a few seconds [to loosen the loc-tite MT uses] then quickly remove the screw. Repeat on all the screws. This is the only really unusual thing I can think of. A pencil type soldering iron is best since it is small enough to put all the heat into the screw, not the surrounding knife.
Step one, heat a soldering iron. When hot, hold it to a screw-head for a few seconds [to loosen the loc-tite MT uses] then quickly remove the screw. Repeat on all the screws. This is the only really unusual thing I can think of. A pencil type soldering iron is best since it is small enough to put all the heat into the screw, not the surrounding knife.
-
Stone Knife
- Posts: 911
- Joined: Sun Jul 13, 2003 8:30 am
- Location: Gone.
- Contact:
more! more!
Hi guys... thanks for your replies!
It's not the screws that I am concerned with (I have a jig for holding round-head bolts and have all the proper wrenches for this Vector, etc.)
It's the disassembly and especially the re-assembly of this coil-powered model that I'm seeking information about. Anyone who's actually done a UMS will also have the info... or probably the Boker Magnum series- heck, ANY coil-powered auto experience may apply!
Looking for tips like, (for example on the Colt 16-K) 'when you're putting the lockback bar in place, use a c-clamp, placing a small shint like a fat toothpick on top of the bar to push it below the frame line. Once it's there, adjust the hole in the bar with the c-clamp so the screw can pass through it without binding..."
-
Stone Knife
- Posts: 911
- Joined: Sun Jul 13, 2003 8:30 am
- Location: Gone.
- Contact:
Got it handled!
With a little help from my friends...

Note mirror polish I put on blade sear (notch) and plunge lock base...
Also- found that crocus cloth at McClendon's sure enough!
Note mirror polish I put on blade sear (notch) and plunge lock base...
Also- found that crocus cloth at McClendon's sure enough!
-
ratstuph
- Posts: 1255
- Joined: Wed Apr 16, 2003 11:31 pm
- Location: Land of 10,000 lakes and quite a few flakes...
Hey SK-
Did you take any "before" pics.
The little plunge lock assembly always looks pretty fragile to me, on a decent sized/powered knife. Even the crappy "Rare Big Wood Linder's" seems kind of small. Wish I had the expertise to take it apart and repair the blade pivot washer/screw assembly. It has a grind to it as well.
Rat... (no trap on my ass) ...stuph
sheep-free since '93'...
-
BennytheBlade

- Posts: 2023
- Joined: Wed Dec 18, 2002 2:22 am
- Location: The United States of Texas
- Contact:
-
Stone Knife
- Posts: 911
- Joined: Sun Jul 13, 2003 8:30 am
- Location: Gone.
- Contact:
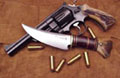
I did take pics all the way through it- here's the damage on the lower plunge lock:

Now bear in mind this was sold to me as a NEW knife! It came like this.
Here is how the plunge lock was oriented when I first opened the piece. You can see a bit of the damage right at the blade notch:

(the camera is a Minolta 7Hi in case anybody was wondering)
Now bear in mind this was sold to me as a NEW knife! It came like this.
Here is how the plunge lock was oriented when I first opened the piece. You can see a bit of the damage right at the blade notch:
(the camera is a Minolta 7Hi in case anybody was wondering)
-
The Falcon

- Posts: 2927
- Joined: Fri May 24, 2002 11:21 am
- Location: The Peoples Republic of California
-
Stone Knife
- Posts: 911
- Joined: Sun Jul 13, 2003 8:30 am
- Location: Gone.
- Contact:
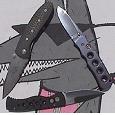
That's why I made the little holder-jig-thingie (as they are probably known in the trade) before starting. You can see a couple of the little red-shrink-tubing coverings on the hold-down pins.
I sure wonder how my "new" knife got so screwed up before it arrived here!
Thanks to the photo now I see that the lower lock part of the plunger looks out-of-round. Something for next weekend's Sunday festivities, which gives you an idea of how festive it actually gets at the S/K palace.
I sure wonder how my "new" knife got so screwed up before it arrived here!
Thanks to the photo now I see that the lower lock part of the plunger looks out-of-round. Something for next weekend's Sunday festivities, which gives you an idea of how festive it actually gets at the S/K palace.
-
sammy da blade
- Posts: 1154
- Joined: Mon Feb 17, 2003 10:43 pm
- Location: U. S. A.
-
BennytheBlade
- Posts: 2023
- Joined: Wed Dec 18, 2002 2:22 am
- Location: The United States of Texas
- Contact:
-
Claudester

- Posts: 2767
- Joined: Mon May 27, 2002 5:54 am
- Location: Out back, Takin a leak
- Contact:
Mr. Stone knife,
If I were you I'd go to BA and pick up a Boker top lock clone and take those apart for practice, you might even find that the plunger could be the same size the one you need. The coil spring fired blade are pretty easy to take apart and put back together and you will only be out a couple of bucks.
If I were you I'd go to BA and pick up a Boker top lock clone and take those apart for practice, you might even find that the plunger could be the same size the one you need. The coil spring fired blade are pretty easy to take apart and put back together and you will only be out a couple of bucks.
One loves to possess arms, though they hope never to have occasion for them. Thomas Jefferson
-
Stone Knife
- Posts: 911
- Joined: Sun Jul 13, 2003 8:30 am
- Location: Gone.
- Contact:
Guys, I have now had this thing apart and back together several times so reassembly pretty much is not an issue anymore, thanks for the suggestions though!
I WILL get ahold of the B-1- that's a great idea!
And yes, it's a coil spring on the 'bottom side' of the blade- in the first picture in this series (the 'blue' picture) you can see the cut-out in the frame where the coil goes...
I WILL get ahold of the B-1- that's a great idea!
And yes, it's a coil spring on the 'bottom side' of the blade- in the first picture in this series (the 'blue' picture) you can see the cut-out in the frame where the coil goes...