A growing number of collectors customize their automatic knives by changing scales, bolsters, blades, doing fileworks, ... Wether you're a guru or just a wannabe knife modder, this is the place to discuss it!
Forum rules
There are a few things you should know before posting in these forums. If you are a new user, please click here and read carefully. Thanks a lot!
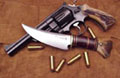
Well finally got some time to myself away from "the making a living" bullshit. Posting some pix of my first go at a Mikov. Learned a lot about pinning, file work and assembly of these great knives in general. The file work was just done by eye, I am fairly pleased with it next time I'll probably lay out the spine with a marker or file. Got the lock up with no play. Just working on an identical one for a fellow Canuck. This one was meant to be a companion knife for those alone times in the woods fly fishing, roving or hunting. I'd like to do something like a theme knife for my third one.
mr_edge wrote:That's a real beauty Doc! What's the scale material? I like how you gave some profile on the scale's depth. Nice filework also.
Hay Mr. Edge the scale material is Oak I like it's stability. worked with files, Then sandpaper up to 600 grit, and then applied a wood sealer I stained it with pecan Minwax furniture stain, sanding with 600 grit bettween each coat tehn buffed. I like the honey gold look.
BennytheBlade wrote:looks great doc... lotsa fun isnt it?
I gotta get one of those rwl-34 knives of davids, and get to work on my leverlocks.
Great filework also. Hard to believe you havent been doing this for a while.
Thanks Benny Yea it's a gas working on these little gems, I really enjoyed the learning curve, but so there is so much great material tips and help here. Many thanks to Nemo and Bill for their time and patience.
Great job, Doc. Did you install the 2 pins beside the lever or are they attached from underneath, or maybe my eye's are not what they used to be.
Really like the affect on the backspring.
Razor_54 wrote:Great job, Doc. Did you install the 2 pins beside the lever or are they attached from underneath, or maybe my eye's are not what they used to be.
Really like the affect on the backspring.
The lever pins are actually crazy glued in from behind. They're notched so that the glue flowes in beside the pins really well.
JAGMAN wrote: Looks great! It appears you painted in the depths of the filework - is this so? very cool.
Jagman
That's right I used Testers model enamel. It's really tough stuff and takes a beating, look for bottles that have "setteled' then pour off the thinner at the top for a great tough enamel. Easy to find in most model shops and cheap. Epoxy would also work great but more hassel. I like the idea of setting the design off. Black would also be great.